Showing posts with label dessert. Show all posts

Wednesday, July 17, 2013

Pinterest and Pudding

 
I have spent way too much time on pinterest. In the amount of time that I have spent on pinterest, I could have learned a new language, taught myself how to knit then knitted an entire sweater, painted my entire house, cured diabetes and discovered a new solar system. Ok, that may be a bit of an exaggeration, but, basically, I have logged more hours on pinterest than I probably should have. But hey, I'd say its better than facebook. Instead of feeling really creepy constantly looking at pictures and reading notifications about people I don't even really talk to anymore, at least I'm learning new tips and tricks regarding crafts, cooking and beauty products. (Isn't it amazing how people have pretty much learned how to make everything homemade... maybe we're reverting back to subsistence living)Some of the ideas recorded online and pinned on pinterest have spurred a creative epidemic, teaching even the shopaholic, dinner-out-every-night types to experiment with at home projects and epicurean adventures. I'd say, even if time spent on pinterest may be a little excessive for some, much good has come out of the vast sharing of photos and ideas on the site.


My personal favorite part of pinterest is the Food and Drink section. Even before I joined pinterest, I would search and peruse countless food blogs looking for exciting new recipes. When I found a recipe I liked, I would copy and paste the instructions onto a work document and save my disorganized findings for later. This became a bit cumbersome after awhile because I had a word document of about 40 pages of random recipes filling up space on my computer. When I found the Food and Drink section on pinterest, I was able to continue my search for creative recipes with an easier method of organization that included pictorial reminders of the dishes I had pinned. It also let me see other people's collections broadening my perspectives of food blogs and creative recipes.


One of those reoccurring recipe ideas I found during my countless hours on pinterest... (I'm going to refer to it as "research" from now on because it sounds better than "useless distraction" and makes me sound all scientific and such)  I mean, during my research was a recipe for pudding cookies. I am NOT a fan of pudding. Ice cream.. defininetly... Jello... sometimes... Pudding... NEVER. So, needless to say, I was skeptical. But blogger after blogger touted the chewy goodness of the resulting cookies after adding pudding to the batter. Despite my disdain for pudding, I am a huge fan of chewy cookies. The softer the better and if they stay soft for more than a day or two, that's fantastic. After enough drool-worthy pictures of pudding cookies on pinterest, my desire for chewiness surpassed my distaste for pudding and I decided to give them a try.
 
My family and I are glad I did. The cookies came out and stayed soft and chewy. The pudding only added a slight flavor, but, with 2 full cups of chocolate chips and other add-ins, the true chocolate chip cookie flavor dominated. My mom ate 2 (sometimes 3) for breakfast for many consecutive days and, once my dad found out about them, they disappeared exponentially faster. So, OK pudding, you win this one, but only because my "research" seamed to be whole-heartedly on your side. You can revel in your victory but I am the real winner because now I have a delicious recipe for SUPER CHEWY cookies.

 
Though I found countless recipes online I adapted mine from Picky Palate. I mean, just look at those pictures on her blog. Pretty convincing scientific evidence, right?

 
Oreo Pudding Cookies
Ingredients
  • 1 stick/1/2 cup unsalted butter, softened
  • 1/2 cup granulated sugar
  • 1/2 cup packed light brown sugar
  • 1 large egg
  • 1/2 teaspoon pure vanilla extract
  • 1 1/2 cups all purpose Gold Medal Flour
  • 3 tablespoons Oreo Pudding Mix
  • 1/2 teaspoon baking soda
  • 1/2 teaspoon kosher salt
  • 1/2 cup mini chocolate chips (I prefer Ghiradelli)
  • 2 King sized bars of Cookies and Cream, cooled and chopped
Directions
  1. Preheat oven to 350 degrees F. and line a large baking sheet with  parchment paper.
  2. In a large mixing bowl cream your butter and sugars until well combined. Add your egg and vanilla mixing to combine. Add your flour, pudding mix, baking soda and salt, stirring to combine. Add chips and m and m’s stirring to combine.
  3. With a medium cookie scoop, place dough 1 inch apart from each other. Bake for 10-12 minutes until cooked through. Let cool on cookie sheet for 10 minutes before transferring to cooling rack.


Tuesday, June 18, 2013

A Whopper of a Birthday!

 
Five decades, a half a century, 50 years... however you put it, turning fifty is a big deal. It's not the numerical label itself that is the most important part. It's the countless years of love and experience that the number represents that is truly important. Even though I've only been around for 20 of my dad's prolific 50 years, I have been the recipient of a half a century's worth of knowledge, lessons and insight. Even when I'm frustrated or downtrodden, he offers a quip of uplifting yet logical advice that picks me up and puts me back on my path. Every single one of his years has been utilized to its full potential as he strives to improve himself, the lives of his patients, and the wellbeing of his family. Even though he feels he gets gipped (half the gifts... sorry Dad), its only appropriate that my Dad's birthday falls so close to Father's Day each year. This time of the year just exemplifies how being a dad is an integral part of my father's identity. And I have to say, he does a pretty good job!

 
Since the whole family has been going in different directions all summer, we made an effort to reserve a special Saturday to enjoy a big family dinner in celebration of my Dad's birthday and Father's day. We wrapped all his presents, planned a delicious grilled lunch, and, of course, made a special cake. My mom, sister and I split the tasks for optimal efficiency ( or waited until the last minute and ran around the house and kitchen in a mad frenzy). Regardless, with the help of some wrapping paper, some fresh fruit and vegetables, and a few cuts of delicious meat, the lunch came together well. It was a great opportunity for my family to sit in the warm summer sun, catch up on the craziness of the previous months, and eat some delicious foods. My Dad seemed pretty pleased with his gifts (OK... maybe not the deodorant) and, surprisingly enough, the chocolate mess of a cake that I made for him.

 
WARNING: I am NOT a cake baker, decorator, or eater. Give me a mess free bowl of ice cream and I am the happiest person in the world, but making and eating cake just results in stress and disaster. This cake was no exception. The plan was solid. I quizzed my mom on what my dad liked, thoroughly. 
 
"What candy does he like?"
 
"Whoppers"
 
"What kind of cake?"
 
"Plain white cake"
 
"Do you have a good white cake recipe?"
 
"He just likes box cake."
 
"BOX cake? Really?" (I am an ardent from-scratcher)
 
"Yes, Duncan Hines White Cake."
 
"Ugh, OK."
 
(This is an abridged version, but you get the idea.)
 
The problem was the execution....
The baking portion went well. The cakes (despite their pre-made boxiness) came out of the oven pretty and smelling lovely.
 
The frosting prep went well. The chocolate malt frosting came out with just the right sweetness (as proof by the numerous fingerfuls that both my sister and my mom stole from the bowl).
 
Even the actual frosting of the cake went fairly well. The icing was a little uneven and I was a bit heavy handed, but hey, at least there wasn't any cake peeking through.
 
Enter ganache.... I had less than an hour until I had to leave for work and the ganache had only been cooling in the freezer for about fifteen minutes. That's enough for a thick layer, right? WRONG.  I poured the ganache the top of the cake and a messy, chocolate waterfall erupted. There was chocolate everywhere, on the counter, on the bottom of the plate, on the floor and a little managed to stay on the cake. Let's just say, clean-up was not my favorite thing. Two chocolate-covered kitchen towels later, the cake was safely stored in the freezer and I breathed a huge sigh of relief. NEVER LET ME BAKE A CAKE AGAIN!!!
 
But the smile on my Dad's face as he bit into the cake was worth it.

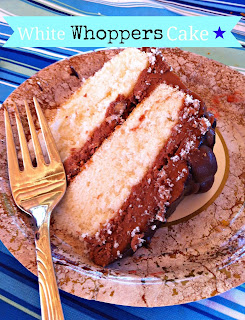
White Whopper Cake
Cake
 
1 box Duncan Hines White Cake (follow box ingredients and instructions)
 
- baked in 2 9" round pans
 
Chocolate Malt Frosting ( adapted from Bakergirl )
- 1 cup butter, softened
- 1/2 cup unsweetened cocoa powder
- 3/4 cup heavy whipping cream
- 1/2 chocolate malt powder (I used Ovaltine)
- 5 cups confectioners' sugar
 
To make the frosting, in a large bowl, beat butter and cocoa powder at medium speed with an electric mixer until creamy.

In a small bowl, combine cream and malted milk powder, stirring to dissolve. Add cream mixture to butter mixture, beating at low speed to combine. Gradually beat in confectioners' sugar until smooth.
Ganache Topping
 
3/4 cup heavy cream
3/4 cup chocolate chips
 
To make ganache, bring heavy cream to a boil in a small sauce pan. As soon as it starts to boil, remove from heat and pour over chocolate chips. Let the mixture sit (unmixed for 10 minutes). After 10 minutes, stir the mixture until well combined. Allow the ganache to cool to desired consistency before pouring over cake (and make sure you have the base of the cake prepared for ganache overflow).
 
For Decoration
1/2 cup chopped whoppers
more whoppers for decoration
 
To assemble cake
 
Frost the first layer of the cake with 1/4 of the icing. Sprinkle the chopped whoppers over this layer of icing. Cover with the second layer and frost the entire cake, starting with the top and moving to the sides (this makes a THICK layer of icing). Drizzle the slightly cooled ganache over the cake (you can do this any way you want, like a waterfall or just a simple drizzle). Decorate the top of the cake with a few more whoppers.


Friday, May 10, 2013

Twenty is the new twelve, right?

 
My Human Development class this year spent a decent amount of time discussing the fairly recent concept of Emerging Adulthood. As children grow up and pursue higher education, they are delaying their development into full blown adults by allowing themselves more time for identity discovery. As my professor informed us about this fascinating new life stage, he reminded us that we are all in the throes of this very stage of development. And BANG... it hit me. I am approaching that scary, intimidating period of my life called adulthood. The very thought of it made me want to fly back to Neverneverland and never ever leave!
 
As it turns out, I wasn't the only one of my friends who felt the pressure of adulthood. My best friend recently turned 20 (yep, she kissed those teenage years goodbye, whether or not she was ready to leave them). Though I wished her Happy Birthday (via text, facebook and of course, the classic hallmark card), she still expressed a hint of sadness over the feeling of.. well... feeling OLD.
 
With May being the month of birthdays amongst my friends, I've had a lot of time to think about turning 20 (though, thankfully I still have more than two months to fully accept it). I told my mom that I was concerned and she said, "What?! Your twenties are great! I just turned 50!" So I guess when you put it into perspective, the twenties aren't so bad. You're young, adventurous and you bring that youth and excitement into the adult world. It's not adulthood that changes you, it's your youthful perspective that changes modern adulthood. So, let us emerge, strong, proud, and maybe a little awkward from our teenage years and embrace being adults.


As I mentioned, my best friend turned 20 a few days ago. And when I say best friend, I mean it. We bonded over crayons in kindergarten and have been inseparable ever since. I was worried that as we went off to college, we would begin to grow apart, finding different interests, different lives. Luckily, though we have found different interests, we have lots of similarities to bind us together. We both have found solace in religion, we love to play Frisbee and we even enjoy snacking on cereal. Another thing we both love is the classic peanut butter and chocolate combination. To remind her of our past and future friendship, I decided to bake some decadent peanut butter and chocolate cake balls for a birthday treat.

 
I didn't realize the cake ball process was so time intensive. I baked the cake, crumbled it, made the icing, mixed the icing and cake, rolled the cake balls and froze them all the day before. 

 Then came the dipping... The chocolate looks so deliciously innocent obediently dripping off that spatula, doesn't it? Well, its totally faking. By the time I was done dipping the cake balls, there was chocolate splattered everywhere. I used about 20 toothpicks trying to coax the chocolate neatly onto the balls. In my attempt to smooth out the chocolate, I added half and half and the whole mixture congealed! Ha, chocolate, innocent, SWEET, ha... LIES!


Luckily, they came out well and I hope my best friend enjoyed them! Peanut butter and chocolate is not only the perfect treat, but the perfect analogy for our friendship. She's sweet and smooth, I'm a little nutty, and, together, we make an awesome pair!

Thursday, January 3, 2013

Cookie Catastrophe

     I usually like to think of myself as being pretty adept in the kitchen. I can't say that I can slice, dice, chop and fry like a Food Network star, but I do know how to use a pan, a knife and a recipe with proficiency and at least some grace. Unfortunately, just when I start to feel confident with my developing kitchen skills, along comes a humbling experience. It just so happens that one notably humbling kitchen experience occured over Holiday break.
     When I got home from school, I was especially excited to blow off my finals steam with the heat of a nice warm oven. In the spirit of Christmas, I decided to make some classic sugar cut outs for the family and me to decorate. The cookies came out quite well, crispy on the outside and chewy on the inside, spiked with the delicious smell of cinnamon . After letting them cool, I made some icing and my mom and I decorated the cookies while watching Christmas movies. Nothing could feel more cozy and Christmasy than a warm kitchen, a Christmas movie and decorating festively shaped cookies. To add to the enjoyment, my dad loved them! He ate at least 3 that night and within a day, told me that I would have to make more.  The recipe made three dozen deliciously decorated cookies, but, despite the joy they brought, there just wasn't any room for them. So, to try to save space, we stored the excess cookies on plastic Christmas plates in the oven for safe keeping (or so we thought).
A few days later, I was still in the mood for holiday baking, so I decided to surprise my mom with a breakfast of her favorite nut cookies, fresh from the oven. In an effort to complete the dough and bake the first batch before my mom woke up, I hastily gathered the ingredients, read through the recipe and preheated the oven. The dough came together quite easily, and it was ready to be filled and rolled within a half an hour of starting the recipe. It was my first time trying the recipe and I was ecstatic that everything was coming together so quickly and smoothly. But then, I smelled it...
It was that awful, burnt rubber kind of smell. I pealed myself away from my feverish dough-rolling and turned around to see smoke billowing out of the oven. I ran to the kitchen, opened the oven door and saw my dad's favorite cookies (burnt to a crisp) perched precariously on top of melted plastic. At the bottom of the oven, a small fire was burning. I was terrified. What if something else caught on fire and burned the whole house down. Like any logical person, I began to scream and shout a few unnecessary explitives. Instead of waking up to a lovely batch of nut cookies, my mom woke up to a smokey kitchen and a screaming daughter.
Thanks to my mom's amazing ability to stay calm in high stress situations (obviously, it's not genetic...) and some quick thinking, we managed to put out the fire, air out the house with countless open doors and windows, and clean up the sticky, plastic mess that covered the inside of the oven. The nut cookies were baked in my grandmother's oven (who conveniently lives right next door) and my house is still standing. A few days later, I even regained enough confidence to make a second batch of the sugar cookies without the tantilizing scent of melting plastic.
So, even though I was knocked down a few pegs due to my kitchen mishap, I certainly added an interesting story to my Christmas party small talk arsenal. And, despite the untimely death of countless sugar snowmen, stockings and Christmas trees, I enjoyed making both the first and second batches of the cut-out cookies. (Hey, anything is better than studying for an Organic Chemistry final...)
 

Christmas Cutouts

Dough

·         ½ cup margarine or butter (or 1 cup for thicker cookies)

·         1 cup sugar

·         1 egg

·         1 Tbs. milk (or cream)

·         2 cups flour

·         1 ½ tsp. baking powder

·         ½ tsp. salt

·         ¼ tsp. white pepper

·         1 tsp. cinnamon

Icing

·         1 ½ cups XX sugar

·         2 Tbs. cream

·         1 ½ tsp. vanilla


Cream butter and sugar until smooth. Add egg and milk and beat well. Sift together flour, baking powder, salt, ginger, white pepper and cinnamon. Add to butter and sugar mixture. Chill, roll to ¼ inch thickness, and cut. Bake at 350° for 10 minutes, or until lightly browned at edges.

                For icing, beat sugar, cream and vanilla until smooth. Separate into bowls and add color (optional).


Saturday, August 4, 2012

The Birthday Trade-off


                    In late June, I started my first ever summer class. There are so many courses that I wanted/ needed to fit into my schedule for the fall semester that I felt the summer was a good time to get a required course out of the way. So, I decided to sign up for CAS 100 (Effective Speech) through my local branch campus.  Luckily, the class only meets twice a week, Mondays and Wednesdays from six to nine, and it only lasts for roughly eight weeks. Also on the positive side, my professor is very relaxed and capable of putting the class at ease (which is very important when you have to prepare and give five speeches in front of that very class). So overall, even though I’d rather be out in the summer sun or spending time with my friends, my first summer class has not been an unbearably painful experience.

                There was one major downside to this particular summer class. It’s not the exams, or the speeches, or the three hours of sitting in a cold room. It’s that one of those Wednesday classes happened to fall on July 25th. What’s so special about July 25th? Well, it just happens to be my birthday. Through my 13 years of public school, having a birthday right in the middle of summer meant I never had to endure class, or worse, an exam on my birthday. I never had to wake up early or study or impatiently watch the minutes tick by on the clock while a teacher lectures on my birthday. It made for 18 years of blissful, stress-free birthdays. But, do to my first ever summer course and an unfortunate coincidence of dates, I had to endure not only a class on my birthday, but also, one of the two exams that the class requires. Instead of the typical birthday dinner that is our family tradition, I spent my evening studying for and taking an exam on effective speech tactic. Truly scintillating!

                Ok, I’m being a little dramatic. It really wasn’t that bad.  The exam was really easy, even comical. (My professor has a very pronounced sense of humor) The family dinner was rescheduled and was just as delicious a week after my birthday. I still didn’t have to wake up early and one 3 hour class is much better than an entire day of school. The occurrence of class on my birthday actually provided me with an opportunity that I had always wanted to have as a kid.

                In elementary school, the “cool” thing to do was to bring in your favorite baked treat to share with the class on your birthday. I saw and ate everything from homemade gooey chocolate chip cookies to the store-bought, brightly colored, whipped cream frosted cupcakes, depending on the tastes of the child whose birthday was being celebrated.  The treats were handed out by the birthday boy or girl on neatly folded napkins while the class sang “Happy Birthday” to him/her. I always enjoyed the treats and the singing, but there was a part of me that was a little jealous that I wouldn’t be able to share my favorite treat with the class.

                So, in true kindergartener-at-heart fashion, I decided to bake my favorite birthday treat for my class full of adult students.  I chose the chocolate cake that my mom always baked for me for my birthday, and formed it into individual, easy-to-handle cupcakes. I loaded the cupcakes with delicious peanut butter buttercream frosting, once again reuniting my two favorite flavors. I even brought my own colorful napkins for serving. The best part, though, was when my class decided to sing happy birthday to me! Even though I was celebrating my 19th birthday, I felt like a little kid again, savoring the moment in the birthday spotlight.

                So, all in all, having class on my birthday was a nice trade-off for the opportunity to serve my cupcakes while being sung to.


Chocolate Cupcakes


  • 3/4 Cup Salad Oil
  • 2 Eggs
  • 1 tsp. Vanilla
  • 3/4 Cup Unsweetened cocoa powder
  • 2 Cups Flour
  • 2 Cups Sugar
  • 2 tsp. Baking soda
  • 2 tsp. Baking powder
  • 1/2 tsp. Salt
  • 1 Cup Milk
  • 1 Cup Hot Coffee
1. Preheat oven to 350 degress F.
2.  In a mixer bowl, combine salad oil and sugar. Blend well. Add in eggs one at a time. Slowly add hot coffee and milk, making sure not to cook the eggs. Add vanilla.
3. In a separate bowl, sift together cocoa, flour, baking soda, baking powder, and salt.
4. In small batches, combine the dry and wet ingredients.
5. Scoop batter evenly into a cupcake pan. (The cupcakes will rise so do not overfill).
6. Bake for 25 minutes. Check centers with a toothpick for doneness.

Peanut Butter Buttercream

  • 3/4 Cup Butter
  • 1/2 Cup Creamy peanut butter
  • 1 tsp. vanilla
  • 3-4 Cups powdered sugar
  • 3-4 tbs. milk
1. Combine butter, peanut butter and vanilla.
2. slowly add in powdered sugar, being aware of the texture.
3. Add in milk (amount depends on desired texture).
 
COOL THE CUPCAKES, FROST AND SAVOR!


Saturday, July 21, 2012

Splurge on the Urge


I’m a planner. I thrive on the consistent and the expected. I eat my meals at roughly the same time every day, maintain a fairly regular “bedtime,” and keep a normal exercise schedule.  My guess is that this is just an expression of my type A personality. Basically (extrapolated a little from my chemistry class), the world naturally tends toward entropy, or chaos.  If I maintain a consistent schedule, then I avoid most of the effects of chaos’ influence and keep my perfect, little, type A world (or, at least, I like to believe so).
                Unfortunately, there is that one thing that I just can’t avoid. I think its called human nature or something like that. Even when I think I know exactly what I should do, I change my mind and want to do something completely different… something new, something reminiscent or something just plain exciting. So, despite my propensity for planning, I sometimes have random urges to do certain things (some normal and some unusual). Some of my most recent urges include:
1.       Dip dying my hair purple (I got the dye, but I still haven’t done it yet)
2.       Going to the drive-in
3.       Seeing the Dark Knight Rises at midnight
4.       Starting a blog? (Ok, that wasn’t THAT recent)
5.       Having a tie dying party
6.       Playing paintball (unfortunately, I haven’t gotten ahold of a paintball gun)
7.       Taking a day trip to Philly
8.       Going to see a musical
Despite this random list of things, my most common “urges” are the ones that require a kitchen, some delicious ingredients, and some good old oven heat. I’ll just be sitting at a table, reading a book or watching TV and my Martha Stewart senses will start tingling. Thoughts of cookies, cakes and pies will start running through my head, and I will make my way to the fridge to start scoping out ingredients. Then I let the internet, the family recipe book and my imagination guide me to the ultimate reward for following my intuition- some delicious food!
So, recently, as I was sitting at the table drinking my tea and reading the newspaper (Do the comics count?), I had the urge to bake something. To add to the strength of my impulse, I was going to be hanging out with a group of friends that night so it just made sense to bring them a tasty treat.  I started perusing the family recipes and came across a forgotten sugar cookie recipe. The last time I had these cookies was when I was in eighth grade (that was in 2007…). My mom got the recipe from a friend of my sister’s grandmother and decided to bake them for my basketball team. They were a hit! She ended up making them for every single home basketball game. All of the players would anticipate the sight of the box of gooey, cakey sugar cookies, covered in crunchy sprinkles, after a hard fought game.  My mom didn’t mind such a responsibility, though, because the cookies were quick to whip together and produced a bounty of oversized cookies.
When I came across the recipe, I knew I had to make them. What’s more fun to bake for friends than a batch of massive cookies topped with whimsical rainbow sprinkles? Unfortunately, we were out of sour cream and cream of tartar. So, what did I do? Try another recipe? Wait until later to bake? Sit and sulk because I didn’t have the ingredients? NO. I grabbed my wallet and headed to the grocery store just so I could get those two simple ingredients to make my cookies! (Not a very planner-like decision)


Oh boy! It was worth it! Even with tablespoon size globs of batter, the cookies came out huge. They were super soft, just as I remembered them, with a sweet, cakey inside and a moist, lightly browned outside. Some came out a little funny looking because I forgot how much they spread, so I decided to improve the looks of those particular cookies with a simple vanilla glaze, topped with MORE sprinkles. I can’t believe I lived without these cookies for 5 whole years of my life!


Grandma’s Sugar Cookies

Ingredients
·         1 cup margarine (benecol)
·         2 cups sugar
·         3 eggs
·         4 cups flour
·         1 cup sour cream
·         2 tsp baking soda
·         1 tsp cream of tartar
·         1 tsp vanilla
Directions
1.       Preheat oven to 375° F.
2.       Cream butter and sugar. Add eggs, beat until creamy.
3.       Combine flour, baking soda, cream of tartar. Add flour mixture to butter cream, little by little.
4.       Add sour cream and vanilla. Blend well.
5.       Use a small or medium cookie scoop and drop on a greased or parchment lined cookie sheet. Allow the cookies plenty of room to spread.
6.       Sprinkle with colored sprinkles, cinnamon sugar or leave plain. Bake for 8-10 minutes (until edges are lightly browned).
7.       Remove from sheet and allow to cool. If you decide to glaze the cookies, wait until they cool.

Simple Vanilla Glaze

Ingredients
·         2 cups powdered sugar
·         2 tbs milk
·         1 tsp vanilla
Directions
1.       Combine all ingredients in a bowl.
2.       Whisk until a thick, even glaze comes together.
3.       Adjust consistency by adding more sugar or milk.
4.       Drizzle or spread on cooled cookies.


Thursday, July 12, 2012

Stranded at the Drive-In


“Summer sun, something’s begun but oh, oh those Summer Nights!” – Grease

When I was little, I thought that I should have been born in the 50’s. Somehow, I was convinced that I looked much better in a poodle skirt than I did in the colored leggings/ pants my mom used to dress me in (probably, because anything looked better than those leggings). Instead of following the boy band craze, my best friend and I would sing and dance to the oldies. I waited all year for the annual elementary school sock hop, just so I could spend one evening with a scarf in my hair, dancing and twisting to a little rock and roll. So, naturally, when my dad told me one day that there was a drive-in theatre only 45 minutes away in Dillsburg, I had to go! I thought about Danny from Grease, stranded at the drive-in, and I wanted to be there to.

We loaded up our car with chairs, radios and enough snacks to feed a pack of hungry teenagers, and took the drive on the highway to Dillsburg. When we arrived at HAAR's Drive In, it was everything I had imagined. We paid the minimal fee (two new movies for the price of one) and found ourselves a good parking spot in front of the giant screen. Just as we loaded our car, we quickly unloaded and arranged the gear so we had the perfect audiovisual perspective. Soon, the warm summer air began to cool as evening approached. In preparation for the start of the first movie at dusk, we divided up our snacks, bought any foods we may have forgotten at the bustling snack stand, and settled in with our blankets and chairs. Beneath the stars, surrounded by the authentic environment of an old-time drive-in theatre, I watched two movies late into the night with my family. On the car ride home at 1 AM, with my eyelids heavy with fatigue, I thought happily of the amazing night I had just spent and the memories I had created.

The movie theatre is now celebrating its 60th anniversary. For six full decades, children and adults alike have been dazzled by the immense screen and the unique environment of HAAR’s. In honor of the unique memories and opportunities that the theatre has given to so many people I know, a close group of friends and I loaded up a van and decided to relive the excitement of the drive-in theater.  Arriving at the theatre at 6:30 (two and a half hours before the movie was scheduled to start), we picked a prime spot to set up ourselves near the projector. Once we set up our chairs and coolers outside, we huddled back into the air conditioned van to escape from the sweltering heat outside. We spend two full hours playing card games and telling stories, laughing about our summers. I felt like a kid again, just as excited as I had been as a little kid while waiting for the movie to start. Whether you’re 8 or 18, there are certain summer traditions, like going to a drive-in, that bring out the child in you and spark an unquenchable feeling of youthful excitement. 

So what does this have to do with food? As I mentioned about my first experience, part of the journey to the drive-in theatre involves packing the car with enough snacks to last for two movies. When I was younger, we packed enough food to “feed a pack of hungry teenagers.” This time, I had to bring enough food to feed an actual pack of hungry teenagers. I must admit, there is the added help of the AMAZING snack stand which sells countless mouthwatering concessions, including burgers, fries, snow cones, milkshakes, popcorn and Dillsburg’s famous Dill pickles. With such a low fee for the movie tickets, I’m convinced that the theatre makes most of its money from the continually crowded snack stand. Regardless of the aid from the stand, I had to bring snacks that were easy to pack, fun and satisfying. I chose to bring honey cinnamon bugles, sparkling grape juice jello and traditional whirly pop buttered popcorn.


Honey Cinnamon Bugles
(Modified from Farm Bell Recipes and Joy of Baking )
Ingredients
·         2 Bags of Original Bugles
·         Butter Pam (or similar cooking spray)
·         2 tablespoons ground cinnamon
·         ½ cup honey
·         ½ cup vegetable oil
·         1 cup packed brown sugar
·         1 teaspoon vanilla extract
·         Cinnamon sugar for sprinkling
Directions
1.       Preheat oven to 300°F. Line two baking sheets with parchment paper.
2.       Empty the bags of bugles into a large bowl with room for tossing. Lightly spray the bugles with pam and sprinkle two tablespoons of cinnamon on the bugles while tossing them.
3.       Measure the honey, vegetable oil and brown sugar into a medium sauce pan. Bring the ingredients to a boil, stirring constantly, so the ingredients dissolve and combine completely. Once at a boil, remove the pan from heat, add the vanilla and quickly prepare it for pouring.
4.       (This step may require 2 people) Slowly empty the contents of the pan over top the bugles, constantly tossing them at the same time. Toss the bugles until they are coated evenly, then spread them in one even layer on both pans. Sprinkle the bugles generously with cinnamon sugar.
5.       Place the bugles in the oven for 10 minutes. After 10 minutes, stir the bugles and return for the oven for another 10 minutes. (If the pans were on two separate racks, rotate them at this time. When the honey has browned, remove from the oven.
6.       Allow the mixture to cool for a few minutes. Before it cools completely, gently break the pieces apart with your fingers.

White Grape Juice Jello
(Modified from The Jello Mold Mistress)
Ingredients
·         2 packets Knox unflavored gelatin
·         ½ Cup sugar
·         1 ½ Cups sparkling white grape juice
·         2 cups boiling water
·         1 pint raspberries
Directions
1.       Set shot glasses or plastic Dixie cups (This is what I used, but they were a bit large and ended up with SOLO written across the top of them) in a glass baking dish.
2.       Combine the packets of gelatin with the boiling water and stir immediately. Add the sugar and the white grape juice and stir to dissolve and combine.
3.       Ladle the mixture evenly into the cups or glasses. (My liquid foamed at the top)
4.       Place the baking dish in the freezer or fridge for 5-10 minutes just to cool slightly.
5.       Wash and prepare the raspberries.
6.       Sprinkle the berries evenly into the jello cups and return to the fridge until the jello solidifies.
7.       To remove the jellos, poke a small hole in the top of the cups and run the outside edges of the jello cups under hot water. Allow them to wiggle and jiggle out with a little shaking.
The bugles came out very well, especially when fresh from the oven. The honey flavor was quite strong, so if you don’t like honey, I wouldn’t recommend this recipe. (If you want to try different flavors, you can experiment with other granola recipes. Bugles make a great blank canvas for sweet toppings). The cinnamon and vanilla added a unique flavor. The only downfall was, when left out in the air for too long in the heat, the bugles began to absorb the moisture and go stale quickly.

The Jellos were a little bit hard to handle. They were difficult to remove and difficult to eat in one bite (Though the latter complaint made for a very entertaining scene when my friend attempted and failed to eat the jello in one bite) the carbonation was not maintained within the jellos and most of the bubbles ended up on the tip of the cups. Regardless, the flavor was good (probably because I just enjoy the taste of white grape juice). I really enjoyed working with the unflavored gelatin. I’m excited to use it to make jello out of all my favorite fruits and juices.