Friday, July 19, 2013

Feeling a Little Sweet and Nutty

 
Some foods I think of as grown-up foods (risotto, champagne (duh) and pate). Some foods I think of as kid foods (smashed peas, boiled hot dogs, fruit loops). Then, there are those foods that apply across a lifespan, the foods that remind us of the comfort of childhood without revoking or interfering with the independence of adulthood. These are the true comfort foods, including mac and cheese, chocolate chip cookies and, my childhood favorite, peanut butter and jelly.
 
Really, peanut butter and jelly is quite a sophisticated childhood favorite. It is a delicate marriage of sweet and savory, nutty and light, that surpasses the simple sugar-obsessed kid palate.  Also, it allows for countless variations and interpretations. You can substitute almond butter for peanut butter, grape jelly for strawberry jelly, or whole wheat rolls for the classic white bread.  It's utterly simple to make (I was a pbj pro at age 7) yet tastefully complex, an on-the-go meal that never fails to satisfy.
 
Recently, I have been craving peanut butter. Maybe it's nostalgia because peanut butter was always one of my favorite snacks. Or maybe it's my increased activity and need for protein. Either way, all I really wanted was to grab a jar and a span and be left alone for a few delicious hours. Except, peanut butter by the spoonful is just a little bit to calorie dense for that kind of indulgence. Instead, I decided to get creative.
 
If it isn't already obvious, I LOVE to bake. A hot oven and some flour and sugar are the main ingredients of happiness. I especially love baking bread. The smell of working yeast and the pillowy softness of rising dough never fails to delight. So, I decided to combine my two loves and bake bread with a healthy dose of peanut butter. I even opted for a healthier loaf by using mostly whole wheat flour (which happened to enhance the nuttiness of the peanut butter). But as I kneaded the dough and placed it in the bowl to rise, I still felt like something was missing....


Then I remembered my elementary school lunch box. I recalled the days when I would unzip my container and see that marvelous creation, all wrapped snugly in a plastic wrap sheath, and my mouth would begin to water. There it was, a delicious PB&J made with love by my mom, ready to be enjoyed. Sure, I enjoyed the turkey sandwich days too, but the true delight came from the days when I could bite into the soft crust of a PB&J and feel the peanut butter stick to the roof of my mouth.
 
So, then and there, I knew that I needed to transform my simple peanut butter yeast bread into a peanut butter and jelly sandwich loaf. And boy, am I glad I did. With just a simply layer of jelly spread on the dough before placing it into the pan for its final rise, the wonderful and classic PB&J combination was recreated. The jelly moistened the bread around it creating a sweet, gooey texture while the rest of the peanut butter loaf maintained a hearty consistency due to the wheat flour. It's the perfect toasting bread and its a whole peanut butter and jelly sandwich without the messy jars.


Peanut Butter and Jelly Yeast Bread
Ingredients
- 1 1/2 cups lukewarm water
- 2 1/4 tsp. active dry yeast
- 2 Tbsp. brown sugar
- 2 1/2 cups wheat flour
- 1 cup bread flour
- 1/4 to 1/3 cup peanut butter
- Enough jelly to spread a thin layer on the dough
 
Preheat oven to 375 degrees. Combine sugar, yeast and water in a small bowl and allow to sit for 10 minutes or until foamy. Meanwhile, combine the flours and peanut butter so the peanut butter is well incorporated. (I used a pastry cutter but you can use a food processor or even your hands). When the yeast is foamy combine the water mixture with the flour mixture and allow it to form a smooth but not sticky dough. Knead for a few minutes until the dough is thick and smooth. Place in a greased bowl and allow to rise for an hour to an hour and a half. Once the dough has risen, shape it into a rectangle about the width of your bread pan and about 1/2 to 1 inch thick. Spread a generous layer of jelly on the dough, allowing a bare rim around the outside. Roll and seal the dough to create the jelly swirl. Place in a greased bread pan and allow to rise for another 30 to 45 minutes. Once risen to about an inch over the lip of the bread pan, bake for 35-40 minutes. Remove from pan, cool and Enjoy!


Wednesday, July 17, 2013

Pinterest and Pudding

 
I have spent way too much time on pinterest. In the amount of time that I have spent on pinterest, I could have learned a new language, taught myself how to knit then knitted an entire sweater, painted my entire house, cured diabetes and discovered a new solar system. Ok, that may be a bit of an exaggeration, but, basically, I have logged more hours on pinterest than I probably should have. But hey, I'd say its better than facebook. Instead of feeling really creepy constantly looking at pictures and reading notifications about people I don't even really talk to anymore, at least I'm learning new tips and tricks regarding crafts, cooking and beauty products. (Isn't it amazing how people have pretty much learned how to make everything homemade... maybe we're reverting back to subsistence living)Some of the ideas recorded online and pinned on pinterest have spurred a creative epidemic, teaching even the shopaholic, dinner-out-every-night types to experiment with at home projects and epicurean adventures. I'd say, even if time spent on pinterest may be a little excessive for some, much good has come out of the vast sharing of photos and ideas on the site.


My personal favorite part of pinterest is the Food and Drink section. Even before I joined pinterest, I would search and peruse countless food blogs looking for exciting new recipes. When I found a recipe I liked, I would copy and paste the instructions onto a work document and save my disorganized findings for later. This became a bit cumbersome after awhile because I had a word document of about 40 pages of random recipes filling up space on my computer. When I found the Food and Drink section on pinterest, I was able to continue my search for creative recipes with an easier method of organization that included pictorial reminders of the dishes I had pinned. It also let me see other people's collections broadening my perspectives of food blogs and creative recipes.


One of those reoccurring recipe ideas I found during my countless hours on pinterest... (I'm going to refer to it as "research" from now on because it sounds better than "useless distraction" and makes me sound all scientific and such)  I mean, during my research was a recipe for pudding cookies. I am NOT a fan of pudding. Ice cream.. defininetly... Jello... sometimes... Pudding... NEVER. So, needless to say, I was skeptical. But blogger after blogger touted the chewy goodness of the resulting cookies after adding pudding to the batter. Despite my disdain for pudding, I am a huge fan of chewy cookies. The softer the better and if they stay soft for more than a day or two, that's fantastic. After enough drool-worthy pictures of pudding cookies on pinterest, my desire for chewiness surpassed my distaste for pudding and I decided to give them a try.
 
My family and I are glad I did. The cookies came out and stayed soft and chewy. The pudding only added a slight flavor, but, with 2 full cups of chocolate chips and other add-ins, the true chocolate chip cookie flavor dominated. My mom ate 2 (sometimes 3) for breakfast for many consecutive days and, once my dad found out about them, they disappeared exponentially faster. So, OK pudding, you win this one, but only because my "research" seamed to be whole-heartedly on your side. You can revel in your victory but I am the real winner because now I have a delicious recipe for SUPER CHEWY cookies.

 
Though I found countless recipes online I adapted mine from Picky Palate. I mean, just look at those pictures on her blog. Pretty convincing scientific evidence, right?

 
Oreo Pudding Cookies
Ingredients
  • 1 stick/1/2 cup unsalted butter, softened
  • 1/2 cup granulated sugar
  • 1/2 cup packed light brown sugar
  • 1 large egg
  • 1/2 teaspoon pure vanilla extract
  • 1 1/2 cups all purpose Gold Medal Flour
  • 3 tablespoons Oreo Pudding Mix
  • 1/2 teaspoon baking soda
  • 1/2 teaspoon kosher salt
  • 1/2 cup mini chocolate chips (I prefer Ghiradelli)
  • 2 King sized bars of Cookies and Cream, cooled and chopped
Directions
  1. Preheat oven to 350 degrees F. and line a large baking sheet with  parchment paper.
  2. In a large mixing bowl cream your butter and sugars until well combined. Add your egg and vanilla mixing to combine. Add your flour, pudding mix, baking soda and salt, stirring to combine. Add chips and m and m’s stirring to combine.
  3. With a medium cookie scoop, place dough 1 inch apart from each other. Bake for 10-12 minutes until cooked through. Let cool on cookie sheet for 10 minutes before transferring to cooling rack.


Tuesday, June 18, 2013

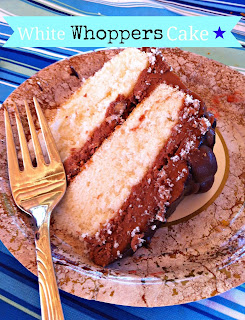
A Whopper of a Birthday!

 
Five decades, a half a century, 50 years... however you put it, turning fifty is a big deal. It's not the numerical label itself that is the most important part. It's the countless years of love and experience that the number represents that is truly important. Even though I've only been around for 20 of my dad's prolific 50 years, I have been the recipient of a half a century's worth of knowledge, lessons and insight. Even when I'm frustrated or downtrodden, he offers a quip of uplifting yet logical advice that picks me up and puts me back on my path. Every single one of his years has been utilized to its full potential as he strives to improve himself, the lives of his patients, and the wellbeing of his family. Even though he feels he gets gipped (half the gifts... sorry Dad), its only appropriate that my Dad's birthday falls so close to Father's Day each year. This time of the year just exemplifies how being a dad is an integral part of my father's identity. And I have to say, he does a pretty good job!

 
Since the whole family has been going in different directions all summer, we made an effort to reserve a special Saturday to enjoy a big family dinner in celebration of my Dad's birthday and Father's day. We wrapped all his presents, planned a delicious grilled lunch, and, of course, made a special cake. My mom, sister and I split the tasks for optimal efficiency ( or waited until the last minute and ran around the house and kitchen in a mad frenzy). Regardless, with the help of some wrapping paper, some fresh fruit and vegetables, and a few cuts of delicious meat, the lunch came together well. It was a great opportunity for my family to sit in the warm summer sun, catch up on the craziness of the previous months, and eat some delicious foods. My Dad seemed pretty pleased with his gifts (OK... maybe not the deodorant) and, surprisingly enough, the chocolate mess of a cake that I made for him.

 
WARNING: I am NOT a cake baker, decorator, or eater. Give me a mess free bowl of ice cream and I am the happiest person in the world, but making and eating cake just results in stress and disaster. This cake was no exception. The plan was solid. I quizzed my mom on what my dad liked, thoroughly. 
 
"What candy does he like?"
 
"Whoppers"
 
"What kind of cake?"
 
"Plain white cake"
 
"Do you have a good white cake recipe?"
 
"He just likes box cake."
 
"BOX cake? Really?" (I am an ardent from-scratcher)
 
"Yes, Duncan Hines White Cake."
 
"Ugh, OK."
 
(This is an abridged version, but you get the idea.)
 
The problem was the execution....
The baking portion went well. The cakes (despite their pre-made boxiness) came out of the oven pretty and smelling lovely.
 
The frosting prep went well. The chocolate malt frosting came out with just the right sweetness (as proof by the numerous fingerfuls that both my sister and my mom stole from the bowl).
 
Even the actual frosting of the cake went fairly well. The icing was a little uneven and I was a bit heavy handed, but hey, at least there wasn't any cake peeking through.
 
Enter ganache.... I had less than an hour until I had to leave for work and the ganache had only been cooling in the freezer for about fifteen minutes. That's enough for a thick layer, right? WRONG.  I poured the ganache the top of the cake and a messy, chocolate waterfall erupted. There was chocolate everywhere, on the counter, on the bottom of the plate, on the floor and a little managed to stay on the cake. Let's just say, clean-up was not my favorite thing. Two chocolate-covered kitchen towels later, the cake was safely stored in the freezer and I breathed a huge sigh of relief. NEVER LET ME BAKE A CAKE AGAIN!!!
 
But the smile on my Dad's face as he bit into the cake was worth it.

White Whopper Cake
Cake
 
1 box Duncan Hines White Cake (follow box ingredients and instructions)
 
- baked in 2 9" round pans
 
Chocolate Malt Frosting ( adapted from Bakergirl )
- 1 cup butter, softened
- 1/2 cup unsweetened cocoa powder
- 3/4 cup heavy whipping cream
- 1/2 chocolate malt powder (I used Ovaltine)
- 5 cups confectioners' sugar
 
To make the frosting, in a large bowl, beat butter and cocoa powder at medium speed with an electric mixer until creamy.

In a small bowl, combine cream and malted milk powder, stirring to dissolve. Add cream mixture to butter mixture, beating at low speed to combine. Gradually beat in confectioners' sugar until smooth.
Ganache Topping
 
3/4 cup heavy cream
3/4 cup chocolate chips
 
To make ganache, bring heavy cream to a boil in a small sauce pan. As soon as it starts to boil, remove from heat and pour over chocolate chips. Let the mixture sit (unmixed for 10 minutes). After 10 minutes, stir the mixture until well combined. Allow the ganache to cool to desired consistency before pouring over cake (and make sure you have the base of the cake prepared for ganache overflow).
 
For Decoration
1/2 cup chopped whoppers
more whoppers for decoration
 
To assemble cake
 
Frost the first layer of the cake with 1/4 of the icing. Sprinkle the chopped whoppers over this layer of icing. Cover with the second layer and frost the entire cake, starting with the top and moving to the sides (this makes a THICK layer of icing). Drizzle the slightly cooled ganache over the cake (you can do this any way you want, like a waterfall or just a simple drizzle). Decorate the top of the cake with a few more whoppers.


Tuesday, June 4, 2013

The Many Phases of Food

Sometimes the kitchen pantry can be a terrifying and sad place.. An endless dark cabinet cluttered with jars and boxes and bottles (Oh MY!), the pantry is home to the leftovers of years of food cravings. Every single container that has made its home in that cabinet started as a wonderfully delectable idea. The idea may have been sparked by a childhood dish memory, a restaurant copying attempt or just pure (and exceptionally dangerous) inspiration. But regardless of the ingredients' beginnings, most of them have the same pitiful fate. They end up, abandoned and forgotten, in the back of the cabinet with the days until their inevitable expiration ticking tirelessly away. All of these forgotten ingredients have fallen victim to the perilous rule of FOOD PHASES!
 
You know what I'm talking about. Food always goes in phases. Whether it is a national trend (such as the country's current love for super foods such as quinoa and avocados) or just a child who chooses to eat nothing but PBJ's for every single meal, everyone is familiar with loving/needing certain foods for a certain amount of time, then quickly forgetting about them, leaving no remembrance of the amorous affair except for a few lonely crumbs. Then, those lonely crumbs end up in the pantry. FOREVER.
 
OK, that's a bit dramatic. . Sometimes, the food love is rekindled and the phase returns, as strong and exciting as ever. There are a lot of ingredients in the pantry that find love once again in new and innovative dishes. Sometimes, if the ingredient just needs a little revamping, a small change in perspective can make a huge difference.
 
Example: Cheerios...
 
Our cereal cabinet has been overflowing lately. Every morning, I open up the cabinet, excited to try some new cereal combination (as long as milk and cinnamon is involved as well). Maybe, bran flakes and corn flakes? How about toasted oatmeal and rice crisps? Regardless, because of my love for breakfast grains and endless combinations, I have accumulated quite a few (large) boxes of cereal, all struggling to fit into that tiny little hutch. All of them are pretty well used, though. They quickly find their way into my little bowl, morning after morning. Except one. The Cheerios. I have nothing against Cheerios. In fact, my Cheerios phase was lovely, sweet, and undeniably delicious. But, the love of Cheerios faded when I found the delicious texture of bran flakes... boring circles were replaced by the smooth, edges of my new branny, flakey cereal. My poor ex-cereal has been sitting its bag in the back of the cabinet waiting for the love to be rekindled. Well, with a little makeover, I have found a NEW love for Cheerios. It turns out that, when crushed up and mixed with brown sugar and bananas and baked to perfection, Cheerios are anything but boring. I found this recipe on the Cheerios website (turns out I'm not the only one who loses interest in plain, old Cheerios) and it worked quite well. The addition of a Cheerio crumble on top was a delicious way to add a little crunch and use up some more of the unwanted cereal. (It's a win-win.) So, maybe I might just enter into another food phase based solely around cereals baked into muffins.


Cheerio Banana Muffins
from Cheerios.com
2 cups Cheerios® cereal
  • 1 1/4 cups Gold Medal® all-purpose flour
  • 1/3 cup packed brown sugar
  • teaspoon baking powder
  • 3/4 teaspoon baking soda
  • cup mashed very ripe bananas (2 to 3 medium)
  • 2/3 cup fat-free (skim) milk
  • tablespoons vegetable oil
  • egg white

  • Topping
    • 1 1/2 cups cheerios (crushed)
    • 1/4 cup packed brown sugar
    • 2 Tbs. margarine (melted)
    Directions
    1. Heat oven to 400°F. Spray 12 regular-size muffin cups with cooking spray, or grease bottoms only of muffin cups.
    2. Crush cereal. In large bowl, stir together cereal, flour, brown sugar, baking powder and baking soda. Stir in remaining ingredients just until moistened. Divide batter evenly among muffin cups.
    3. To make topping, combine margarine, cereal and sugar in a small bowl. Mix with hands until the Cheerios are coated. Sprinkle the topping on top of the unbaked muffins, dividing evenly between all 12.
    4. Bake 18 to 22 minutes or until golden brown.

    Tuesday, May 28, 2013

    I don't drink beer, but I do eat it.


    When I visit a craft fair, I feel like a child (who has just been fed about 30 pixie sticks) that is allowed to run loose in a toy store. No matter how many fairs I attend, they are always simultaneously exciting and overwhelming. For memorial day, my mother and I visited Boalsburg, a quaint, historic Pennsylvania town that claims to be the birthplace of Memorial Day. Whether or not this is true, they sure do act like its a big deal. They have a parade, a carnival, a 5k, museum tours, music, and a beautiful craft fair on a street lined with lovely Victorian homes. Though the craft fair isn't particularly large, the diversity in the products is quite impressive. There is jam, jewelry, photography, clay, these really neat collapsible baskets... and, the most enticing part for my mother, a huge stand filled with pies selling for $2 a slice. The entire street is decorated with beautiful artwork and products and filled with excited people and cheerful music. The whole environment is the perfect unofficial welcome for a long, relaxing and joyful summer.
     
    My favorite part of craft fairs is the variety of displays, as I alluded to above, but my second favorite part is that most of the stands selling food products offer free samples. Every food stand lays out their products like a miniature buffet table just tempting me as I try to discreetly pass by. Of course, most of the time I cannot avoid tasting the products (and REALLY it's just rude to pass by without tasting, right?).
     
    One of the food stands this year was selling products from the Tastefully Simple line. Out of all the samples they had laid out, I chose to sample the beer bread (which is odd because I am 19 and know/care very little about beer). I am GLAD I chose to sample the beer bread though! It was dense and lightly sweet with a crunchy, buttery crust. If it was socially acceptable, I probably could have stood there and taken every single one of their beer bread samples.


    During the two hour ride home, I decided to look on my phone for a copy cat recipe. I knew it had to be complicated. The recipe had to have some crazy ingredient ( like concentrated fairy dust) or  require some unusual technique (such as stir the bread while patting your stomach and spinning in circles) to be THAT delicious. Luckily, I was wrong.... It's such an easy recipe and process! It only requires 4 ingredients and about an hour and fifteen minutes total time from start to pulling that yummy loaf out of the oven. Depending on what type of beer you use, the flavor can be anything you want. ( I let my mom select the beer since I honestly couldn't tell you what a good beer tastes like) But, because there are so few ingredients, make sure you select a beer you really enjoy since the flavor is really exhibited.
     
    *Note: My bread didn't taste exactly like the Tastefully Simple bread, but I actually liked it more. Since we chose a dark beer and brown sugar, the bread was dense and had a sweet, molasses flavor.
     

    Unbelievably Easy Beer Bread
    modified from Simply Fresh Cooking
     
    • 3 cups self rising flour
    • 1/2 cup brown sugar
    • 12 ounces Beer (one that you really like- I used Dogfish Head as per my mother's request)
    • 2 tbs. butter or benecol (benecol doesn't crisp like butter so the crust came out a little soft)
     
    1. Preheat oven to 350 degrees F.
    2. Measure and sift the flour into a bowl.
    3. Whisk the sugar into the flour until evenly distributed.
    4. Pour beer into the mixture and stir until combined (the mixture should be a little lumpy).
    5. Pour into a bread pan and place in the oven. Bake for 50 minutes.
    6. Melt the butter and pour over the bread's crust. Bake for another 10 minutes.
    *WARNING* the smell is amazing and WILL fill your entire house!
     
    * My brother gets some credit for this bread. Even though he is working hard in medical school right now, he is the reason my mom found the Dogfish Head beer in the fridge. Wish I could send some of the bread to ya bro!


    Wednesday, May 22, 2013

    Bagels: Why I get out of bed in the morning....

     
    Waking up in the morning is not a struggle for me. I have always been one of those people who is up with the sun. The problem, unfortunately, is the actual act of getting out of bed. My covers are always so warm and snuggly, and my pillow provides just the perfect amount of softness and support. Really, there is no logical reason to leave, right? Well, there is one. It waits for me in the kitchen every morning. It beckons to me with its crispy, tanned skin and its soft, delectable center. If it weren't for the promise of delicious bagels in the morning, I don't think my feet would ever leave the covers and touch the floor again.


    My first experience with Dutch Crunch bagels was at Wegmans. Choosing a single bagel from the Wegmans bakery collection is akin to choosing one pair of shoes from an entire shoe section. Every one is unique and different, but every one is equally appealing. They have sweet bagels (like French toast, blueberry and cinnamon raisin). They have the classics (like egg, plain, and everything). They have the savory (like poppy seed, cheese, and THE marco polo). Despite the amazing display, I have to say that the Marco Polo bagel has emerged (after many, many trials) one of my favorites. Essentially, after some research online, Marco Polo is Wegmans' special name for Dutch Crunch. Their base bagel is soft and fluffy with a thin but chewy crust and, if you get there early in the morning, it is fresh and warm. The Dutch Crunch topping, a smooth combination of yeast and rice flour, browns ever so slightly in the oven and is marked with the unique cracks that provide the crumbly deliciousness. Wegmans only makes Marco Polo bagels on the weekend (I know, what a tease?!), but whenever my mom and I see them, we scope out the fluffiest bagels with the most topping and choose those for our morning treats. Then, we'll sit in the Wegmans café area, chewing on our slightly toasted bagels, drinking our morning caffeine, and chatting about the day to come. (I would say that's a pretty suifficient motivation for getting out of bed).
     
    Though I cannot replicate the Wegmans bagel perfection, I knew I had to try my own take on the Marco Polo (or for non-wegmans-enthusiasts, Dutch Crunch). I prepared the dough. the night before with a little wheat and bread flour and boiled and coated them in the morning, so they would come out of the oven fresh and hot (hopefully, approaching the fresh taste of Wegmans). Because my mom and I love the topping SO much, I added a little more topping than the typical Wegmans bagel has. It was delicious! Even after breakfast that morning, we enjoyed them in various ways (like as a base for a delicious PBJ or covered in tzaziki). Because the flavor is neutral (its all about the texture), they work perfectly for various preparations.
    
    Base Bagel Recipe
     
    ·         2 ½ cups bread flour
    ·         1 ½ cups whole wheat flour
    ·         1 ½ cups warm water
    ·         2 Tbs. brown sugar
    ·         2 ¼ tsp. yeast
     
    Method
    1.      Combine yeast, sugar and water and allow to sit for 5-7 minutes until foamy.
    2.      Combine flours. Incorporate yeast mixture, adjusting flour until a smooth ball comes together.
    3.      Place the dough in a greased bowl and cover, leaving it in a warm place. Allow to rise until it doubles in size, roughly 1 – 1 ½ hours.
    4.      Once risen, use a scale to evenly divide the dough into 8-12 pieces.
    5.      Allow the dough to rest for 30 minutes on a baking tray lined with parchment paper.
    6.      Roll the bagels, either by making ropes and pinching them together or by poking a hole in the center and stretching it by hand. The holes should be fairly large because they will shrink when they are boiled and baked.
    7.      Cover the bagels with oiled plastic wrap and allow to rest in the fridge overnight.
    8.      In the morning, fill a large pot with 4 quarts of water. Add a tbs. of honey. Bring to a boil.
    9.      Preheat the oven to 400°F. Remove the bagels from the fridge and prepare them for boiling.
    10.  Drop the bagels in the water (3-4 at a time) and boil for 30 seconds. Flip them and boil for another 30 seconds. Remove from the water and place on a clean paper towel. Once all the bagels are boiled, sprinkle cornmeal on baking trays lined with parchment paper. Lay the bagels on the baking tray.
    11.  Bake in the preheated oven for 20-25 minutes, or until golden brown.
     
    Dutch Crunch Topping
  • 1 cup warm water (105-115º F)
  • 2 tablespoons  sugar
  • 2 tablespoons vegetable oil (I only used one because I wanted it thicker)
  • ½ teaspoon  salt
  • 1½ cups  rice flour
  • 1. Combine all ingredients and allow to rest for 10 minutes.
    2. After boiling the bagels, coat them generously in topping.
    3. Allow to rest with topping for a few minutes before baking.


    Friday, May 10, 2013

    Twenty is the new twelve, right?

     
    My Human Development class this year spent a decent amount of time discussing the fairly recent concept of Emerging Adulthood. As children grow up and pursue higher education, they are delaying their development into full blown adults by allowing themselves more time for identity discovery. As my professor informed us about this fascinating new life stage, he reminded us that we are all in the throes of this very stage of development. And BANG... it hit me. I am approaching that scary, intimidating period of my life called adulthood. The very thought of it made me want to fly back to Neverneverland and never ever leave!
     
    As it turns out, I wasn't the only one of my friends who felt the pressure of adulthood. My best friend recently turned 20 (yep, she kissed those teenage years goodbye, whether or not she was ready to leave them). Though I wished her Happy Birthday (via text, facebook and of course, the classic hallmark card), she still expressed a hint of sadness over the feeling of.. well... feeling OLD.
     
    With May being the month of birthdays amongst my friends, I've had a lot of time to think about turning 20 (though, thankfully I still have more than two months to fully accept it). I told my mom that I was concerned and she said, "What?! Your twenties are great! I just turned 50!" So I guess when you put it into perspective, the twenties aren't so bad. You're young, adventurous and you bring that youth and excitement into the adult world. It's not adulthood that changes you, it's your youthful perspective that changes modern adulthood. So, let us emerge, strong, proud, and maybe a little awkward from our teenage years and embrace being adults.


    As I mentioned, my best friend turned 20 a few days ago. And when I say best friend, I mean it. We bonded over crayons in kindergarten and have been inseparable ever since. I was worried that as we went off to college, we would begin to grow apart, finding different interests, different lives. Luckily, though we have found different interests, we have lots of similarities to bind us together. We both have found solace in religion, we love to play Frisbee and we even enjoy snacking on cereal. Another thing we both love is the classic peanut butter and chocolate combination. To remind her of our past and future friendship, I decided to bake some decadent peanut butter and chocolate cake balls for a birthday treat.

     
    I didn't realize the cake ball process was so time intensive. I baked the cake, crumbled it, made the icing, mixed the icing and cake, rolled the cake balls and froze them all the day before. 

     Then came the dipping... The chocolate looks so deliciously innocent obediently dripping off that spatula, doesn't it? Well, its totally faking. By the time I was done dipping the cake balls, there was chocolate splattered everywhere. I used about 20 toothpicks trying to coax the chocolate neatly onto the balls. In my attempt to smooth out the chocolate, I added half and half and the whole mixture congealed! Ha, chocolate, innocent, SWEET, ha... LIES!


    Luckily, they came out well and I hope my best friend enjoyed them! Peanut butter and chocolate is not only the perfect treat, but the perfect analogy for our friendship. She's sweet and smooth, I'm a little nutty, and, together, we make an awesome pair!